The Kettlebell Windmill

Among the vast array of movements one can perform with a Kettlebell, a personal favorite of mine is the kettlebell windmill.  It is, however, frequently misunderstood and performed incorrectly by many.  This is likely due to a lack of understanding about the purpose of the exercise as well as how to load it properly.  Special attention to the details and technical nuances of this exercise is key to ensuring it can be implemented safely and effectively.

What Is It?

Kettlebell Windmill

Kettlebell expert and StrongFirst director of education, Brett Jones, classifies the kettlebell windmill as “A loaded stretch and strengthening exercise” which I find to be an excellent description.  As previously mentioned, most individuals struggle to wrap their heads around this movement because they aren't exactly sure what its function is or where it belongs in a program. 

To elaborate, the primary area where the “stretch” should be felt is in and around the hip area which is the primary driver of the entire movement, if done correctly.  An additional stretch can be felt in the hamstrings and chest as well depending on one’s current mobility status.  Mobility through the thoracic spine is also critical to ensure one can rotate their upper body through the movement effectively, although no traditional “stretch” will likely be felt in that area. 

One could argue that this movement is a full-body strengthening exercise, but the primary emphasis is placed on both the core and shoulder/scapular joint.  To perform this movement effectively, the scapula must remain packed while keeping the arm straight so that it divides the middle axis of the body.  The core keeps the postural integrity of the back intact while also allowing the hips to remain slightly hinged.  Upper body strength also plays a role, as it is what gets the weight overhead in the first place and holds it there throughout the movement.

How To Perform   

1.)   Much like building a house, this movement starts from the bottom up, specifically the stance.  A common mistake I see most people make on this movement is assuming a stance that is too wide which ultimately does not allow for the hips to move properly.  The feet should ideally be hip-width apart, and certainly no great than shoulder-width apart.  A slight angle should be taken such that feet are about a quarter turn or angled outward at 45 degrees. 

2.)   Next, the weight is pressed overhead while the core is braced appropriately.  This means no flaring of the rib cage or sucking the belly in, but instead breathing diaphragmatically and bracing appropriately. 

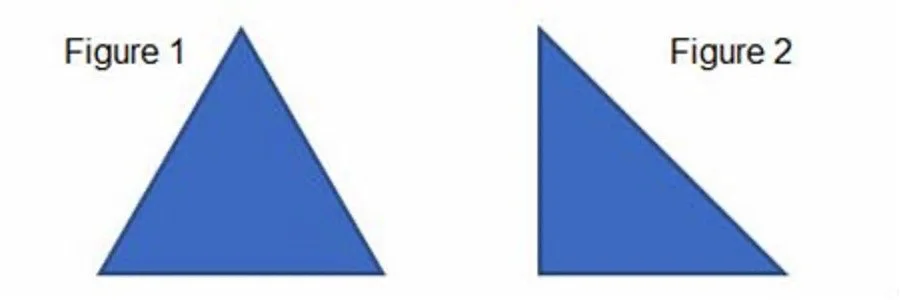
 3.)   You are now ready for what Brett calls the “shift and lift”, a term he coined that I find rather useful in coaching this movement.  The hip that is under the weight shifts back and up at approximately a 45-degree angle, which aids in that leg getting vertical.  The weight distribution should be about 70% on the back leg and 30% on the front leg while the rear heel stays completely flat.  A slight or soft knee bend is advised on the front leg as well so that the hip is more freely able to move, and no strain is placed on that leg itself.  An excellent representation of the “shift and lift” is pictured in Figures 1 and 2 below.  Figure 1 represents the beginning of the movement noted by a symmetrical stance, and Figure 2 represents the shifting of the hips where the rear leg is now vertical and the front leg is at a greater angle. 
Visual adapted from Brett Jones, StrongFirst.com

While the hip shift and lift occur, the upper body must extend in a straight line of the hip, ultimately falling into the same 45-degree angle as it parallels the hip.  Thoracic mobility is key here because the upper body will rotate as the shift occurs so that the arm holding the weight is vertical.  There must be no lateral flexion of the spine here so that stress is not placed on the lumbar spine in any fashion. 

 4.)   Lastly, as the hip shift and lift continue, the free arm should reach towards the inside heel of the front leg, touching the ground if your mobility and execution of the movement are up to par.  Touching the ground does not have to be the primary emphasis of the movement but maintaining control throughout the movement at an increased range of motion will likely provide greater benefits.  Ensure that you maintain the proper weight distribution throughout the entire movement, (70-30), and do not allow any flexion of the spine in any direction.

Where does it belong in a program?

Once you understand the proper execution of this movement, it can still be slightly confusing to determine where exactly it belongs in a comprehensive training program.  If thought of like a restaurant menu, this movement will never be a "main dish", but rather an appetizer or side which enhances the rest of the meal. 

It serves as a fantastic “primer” to heavier compound movements such as the squat, deadlift, or overhead press that place a significant demand on the hips and shoulders respectively.  It is also a fantastic accessory movement that can be placed in between other demanding exercises to provide active recovery or maintain limber mobility.  It must certainly be respected, and requires one full attention to detail, but can truly be implemented wherever one desires it to be in their program or even as a stand-alone movement on days when a lot of sitting occurs.

I would certainly advise starting with little to no weight as you begin experimenting with this movement and learning the proper technique to ensure you do not injure yourself.  Once you've confidently grooved the pattern in an unloaded manner, start adding load slowly and ensure that range of motion/movement execution never comes at the cost of movement quality.

Conclusion

Perhaps one of the most misunderstood movements out there today, the kettlebell windmill, is a phenomenal addition to any training program when executed correctly.  It challenges hip, shoulder, and thoracic mobility as well as scapular stability in a way that is unmatched by many other movements.  It is extremely versatile and be done by novice to advanced trainees alike.  Give it a shot and toss it into your next training program to test it out for yourself.  Thanks for reading.  
 

How To Execute and Implement the Turkish Get Up (TGU)

The Turkish Get Up (TGU) is perhaps one of the most unique movements one can perform due its paradoxically challenging yet simple characteristics.  The exact origins of this movement aren’t universally known; however, many speculate that it dates back several decades or even centuries, popularized by wrestlers from what is now known as Turkey. 

To the naked eye, it is simply nothing more than getting up from a supine to standing position while holding a weight over one’s head.  Conversely, anybody who has tried it with significant load can inform you how difficult it truly can be.  Most coaches and fitness enthusiasts alike understand the meticulous details required to execute this movement properly with maximal load, hence why it is important to learn properly.  Benefits of the TGU are essentially endless, ranging from challenging one’s core and shoulder stability to testing their hip and thoracic mobility.  Personally, I am a huge fan of the TGU, incorporating into both my own program and those who I train on a regular basis.  I believe that everybody can and should perform this movement from time to time, with proper form of course.  Below is a step-by-step breakdown of how to properly perform the TGU. 

Step 1: The Set Up

While getting set up to begin this exercise might not seem like an actual “step”, it is where I see the most mistakes occur.  If one isn’t set up properly to start, then the only thing they are setting themselves up for is failure. 

Begin this exercise in a supine position with one of your arms pointed straight towards the ceiling, hand in line with your shoulder (the one that will be holding the weight), shoulder blade packed down and back, and the same side leg bent so that your foot is flat with the heel close to under your knee.  On the opposite side of your body, extend your arm out to an angle of approximately 45 degrees with the palm down.  Similarly, keep the leg on this side of your body straight and abduct it out to about 45 degrees directly in line with your arm.  You should now be in a good position to start the TGU.

Step 2: Sit Up To The Elbow

The next step is quite small.  Begin by fixing your eyes on the weight.  Next, drive directly into the ground with both heels and your palm (keeping your near side leg bent still) while sitting up to your elbow.  You should keep the weight directly above your shoulder without allowing it to dip and keep your three free limbs glued to the ground.  The most common mistake I often see here is individuals lifting their legs/heels off the ground or allowing their bent leg to excessively cave inward, a little bit is ok.

Step 3: Sit Up To The Hand “Squish The Bug”

During this step you will sit up from your elbow to you hand so that your arm is extended and ready to base from for the next step.  One of the major cues I use to help with this step is imagining a bug underneath your hand that is on the ground.  I want you to squish this bug underneath your hand as you sit up from your elbow to your hand.  Your hand should rotate 180 degrees creating some “torque” so to speak, such that your fingers go from facing in front of you to somewhere behind you.  Everything else remains the same, the weight remains over your shoulder, and you now have an upright torso.

Step 4: The Hip Bridge

This step is one of the most difficult parts of the movement for many people.  This is why I often recommend repping this part of the movement in isolation for extra practice.  What you need to do is keep your base arm extended, drive through both heels, and bridge your hips up straight to the ceiling.  It is imperative to get your hips as high as possible here which will become obvious as to why in the next step. 

Step 5: Sit Through

During this step hip mobility will be greatly challenged.  With your hips bridged as high as possible per the last step, you will now bring your straight leg underneath your same side hip.  You will have to bend your knee as you are bringing the leg through, and it is critical to place your knee directly underneath your hip.  The same side arm should still be on the ground while the weighted arm is remaining steady and straight above your shoulder as mentioned in previous steps.  This position is commonly referred to as a half kneeling “windmill’ which is very challenging under load. 

Step 6: Time to Stand Up

While most people who get to this point can stand up from here no matter what level of technique they use, it is still imperative to finish the movement properly.  You will take your base hand off the ground, bend your torso back to a straight position, and take a small step inward step with your bent leg so that you are in an upright position looking similar to the bottom of a lunge.  From here, while keeping the weight straight above you, step your back leg forward and stand up tall.  This completes the TGU, which can and should be done in reverse back to the ground to complete one full repetition. 

Summary: 

While the TGU can quickly becoming a daunting movement to execute due to its plethora of technical nuances, I believe anybody can perform this movement.  I encourage most individuals to start with little to no weight whatsoever while focusing on technique.  Once you can perform this movement perfectly with a shoe or foam block on a closed fist without it falling off throughout the entire motion, it is then that you are ready to move on to using a light weight.  If there is a particular step that you struggle with on this movement, practice it in isolation for several repetitions until you feel comfortable doing so. 

Breathing Properly For Lifting

Perhaps one of the most overlooked aspects of improving maximal strength or the ability to move significant loads is optimal breathing technique.  It may seem insignificant compared to other technical lifting nuances, however, it is the foundation that underpins all proper and safe movement patterns involving heavy loads.  Most of us are never taught how to breathe or brace properly when lifting which is likely attributable to the fact that we’ve all been able to unconsciously breathe since birth and assume the same process applies to lifting.  We must retrain ourselves to breathe differently when lifting heavy loads, and fortunately, it is a relatively simple process that can be quickly integrated to improve performance.  

Common Error

The origin of improper breathing mechanics for heavy loads stems from what most of us are taught at the beginning of our physical activity journey.  Take the squat for example, perhaps we learn this movement as a child or newbie gym-goer with nothing more than our own body weight (hopefully this is the case) and we are instructed to “breath in on the way down” and “breathe out on the way up”.  Most people might scratch their head and wonder, “yeah, how else are you supposed to do it?”, which is a fair question.  This method isn’t necessarily incorrect when we are only moving our body weight or light loads that are not dangerous to us, but what about when we want to lift something significantly heavier for ~1-5 repetitions?  What happens then?

Let’s start with the first issue, chest breathing.  Most of us take a big deep “shallow breath” (I know it sounds like an oxymoron but stay with me) and fill our chest with air when we think of “breathing in”.  Ask yourself, what function does this provide?  Quite frankly, not much. 

The second issue comes right after which is the exhale or “breath out” portion.  This is not advisable when using heavier loads which will be further explained in a minute.  The primary point that is important to note about this technique of breathing is that it doesn’t serve any real function regarding heavy resistance training, it simply brings air in and pushes it back out.  This might be ok for aerobic exercise, and while still necessary so you don’t pass out, not the primary emphasis of breath control during anaerobic movements aka resistance training. 

The Right Way

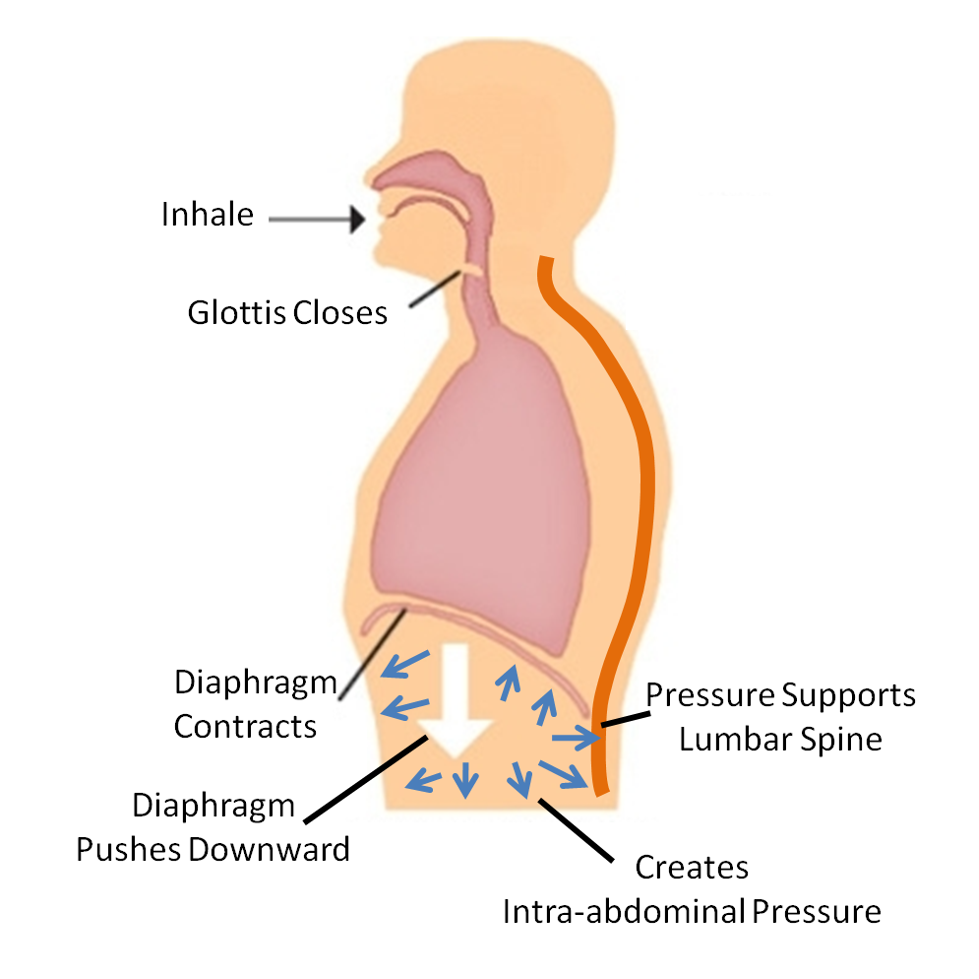
You're probably wondering now, "how the heck am I supposed to be breathing anyway if I've been doing it wrong this whole time?".  Great question… deep diaphragmatic breathing!  Before I give you all the details, here’s a quick image of what I’m talking about:

As you can see when we breathe diaphragmatically or “deep into our abdomen area” we create internal pressure.  When we combine this internal pressure with proper bracing of our core muscles, we essentially create our own “brace” if you will, or barrier around our spine to keep things stable.  This is an important distinction from simply attempting to brace our core muscles alone.  We are instead actively filling the diaphragm, and bracing everything properly, to create the desired stability.  Now just imagine if you were to exhale or let all that air out on the concentric portion of your squat.  That would be quite disastrous likely causing you to fold or fail on the lift.

 This technique does have a name; it’s called the “Valsalva” maneuver.  You can try this for yourself, and I highly encourage you to do so if you intend on lifting anything heavy.  Start by breathing deep into your abdomen such that your belly begins to slightly protrude out.  Ideally, you’d like to avoid any movement or rise in your chest while doing this.  Next, once you've filled your abdomen with air, contract your core muscles tight and hold them in place which includes essentially everything from your rib cage down to your glutes.  Now you are ready to descend on your squat and return to the top while maintaining this internal pressure throughout the entire movement.  This does require you to "hold your breath", which can cause an increase in blood pressure and if held for too long, cause lightheadedness, so be careful and reset your breath between each rep to ensure you don't pass out!  Also, consult with your health care provider if you are at risk for any issues which may be of concern with this type of breathing or your blood pressure in general just to be safe. 

 Summary

Proper breathing technique is perhaps one of the simplest yet overlooked aspects of training we can all control.  It is something that can be actioned immediately and makes a huge difference in our overall level of performance and safety.  It doesn’t take long to learn, and once implemented correctly, will become the preferential method with which to perform all moderate to heavy resistance training movements.  Don’t just take my word for it, try it for yourself and note the differences in how you feel and perform.  Good luck.


Bear Crawls: The Breakdown

Crawling is touted as a highly beneficial movement pattern included in numerous training programs which offer various performance-enhancing, rehabilitative, and corrective benefits.  Not only does it tie together the vestibular (balance), proprioceptive (awareness), and ocular (visual) systems of the human body, but it can potentially improve hand-eye coordination and reflexive strength or one’s ability to anticipate movement.  This is also sometimes referred to as motor control.    Despite its uprise in popularity over the past several decades, crawling represents a primitive movement pattern we all come to master in our developmental years which is far from new.

Children instinctually begin to crawl from a very young age as they are hard-wired to do so, unfortunately, many adults lose the ability to properly crawl throughout their adult years.  This is due to several factors including a sedentary lifestyle, injuries, declining fitness, and atrophying neural pathways, to name a few.  Despite this reality, crawling can and should be part of a holistic training program, however, most individuals cannot execute any crawling variation properly which can lead to more harm than good.

The Good, The Bad, and The Ugly

When most coaches refer to crawling within a training program, they are often referring to “Bear Crawls.”  Typically, this involves an awkward shuffle or gallop with the butt high in the air which places a great deal of stress on one’s elbows, shoulders, and wrists.  Unfortunately, these are not the correct way to do Bear Crawls and could be detrimental.

A properly executed crawling movement stimulates the muscles throughout the arms, legs, and torso which activates sensory nerves in the feet/hands.  Every time a step is taken the corresponding muscles around that area reflexively fire.  The contra-lateral (opposite) shoulders and hips learn to work in a coordinated fashion where the mind and body are being stimulated in an equally taxing fashion. 

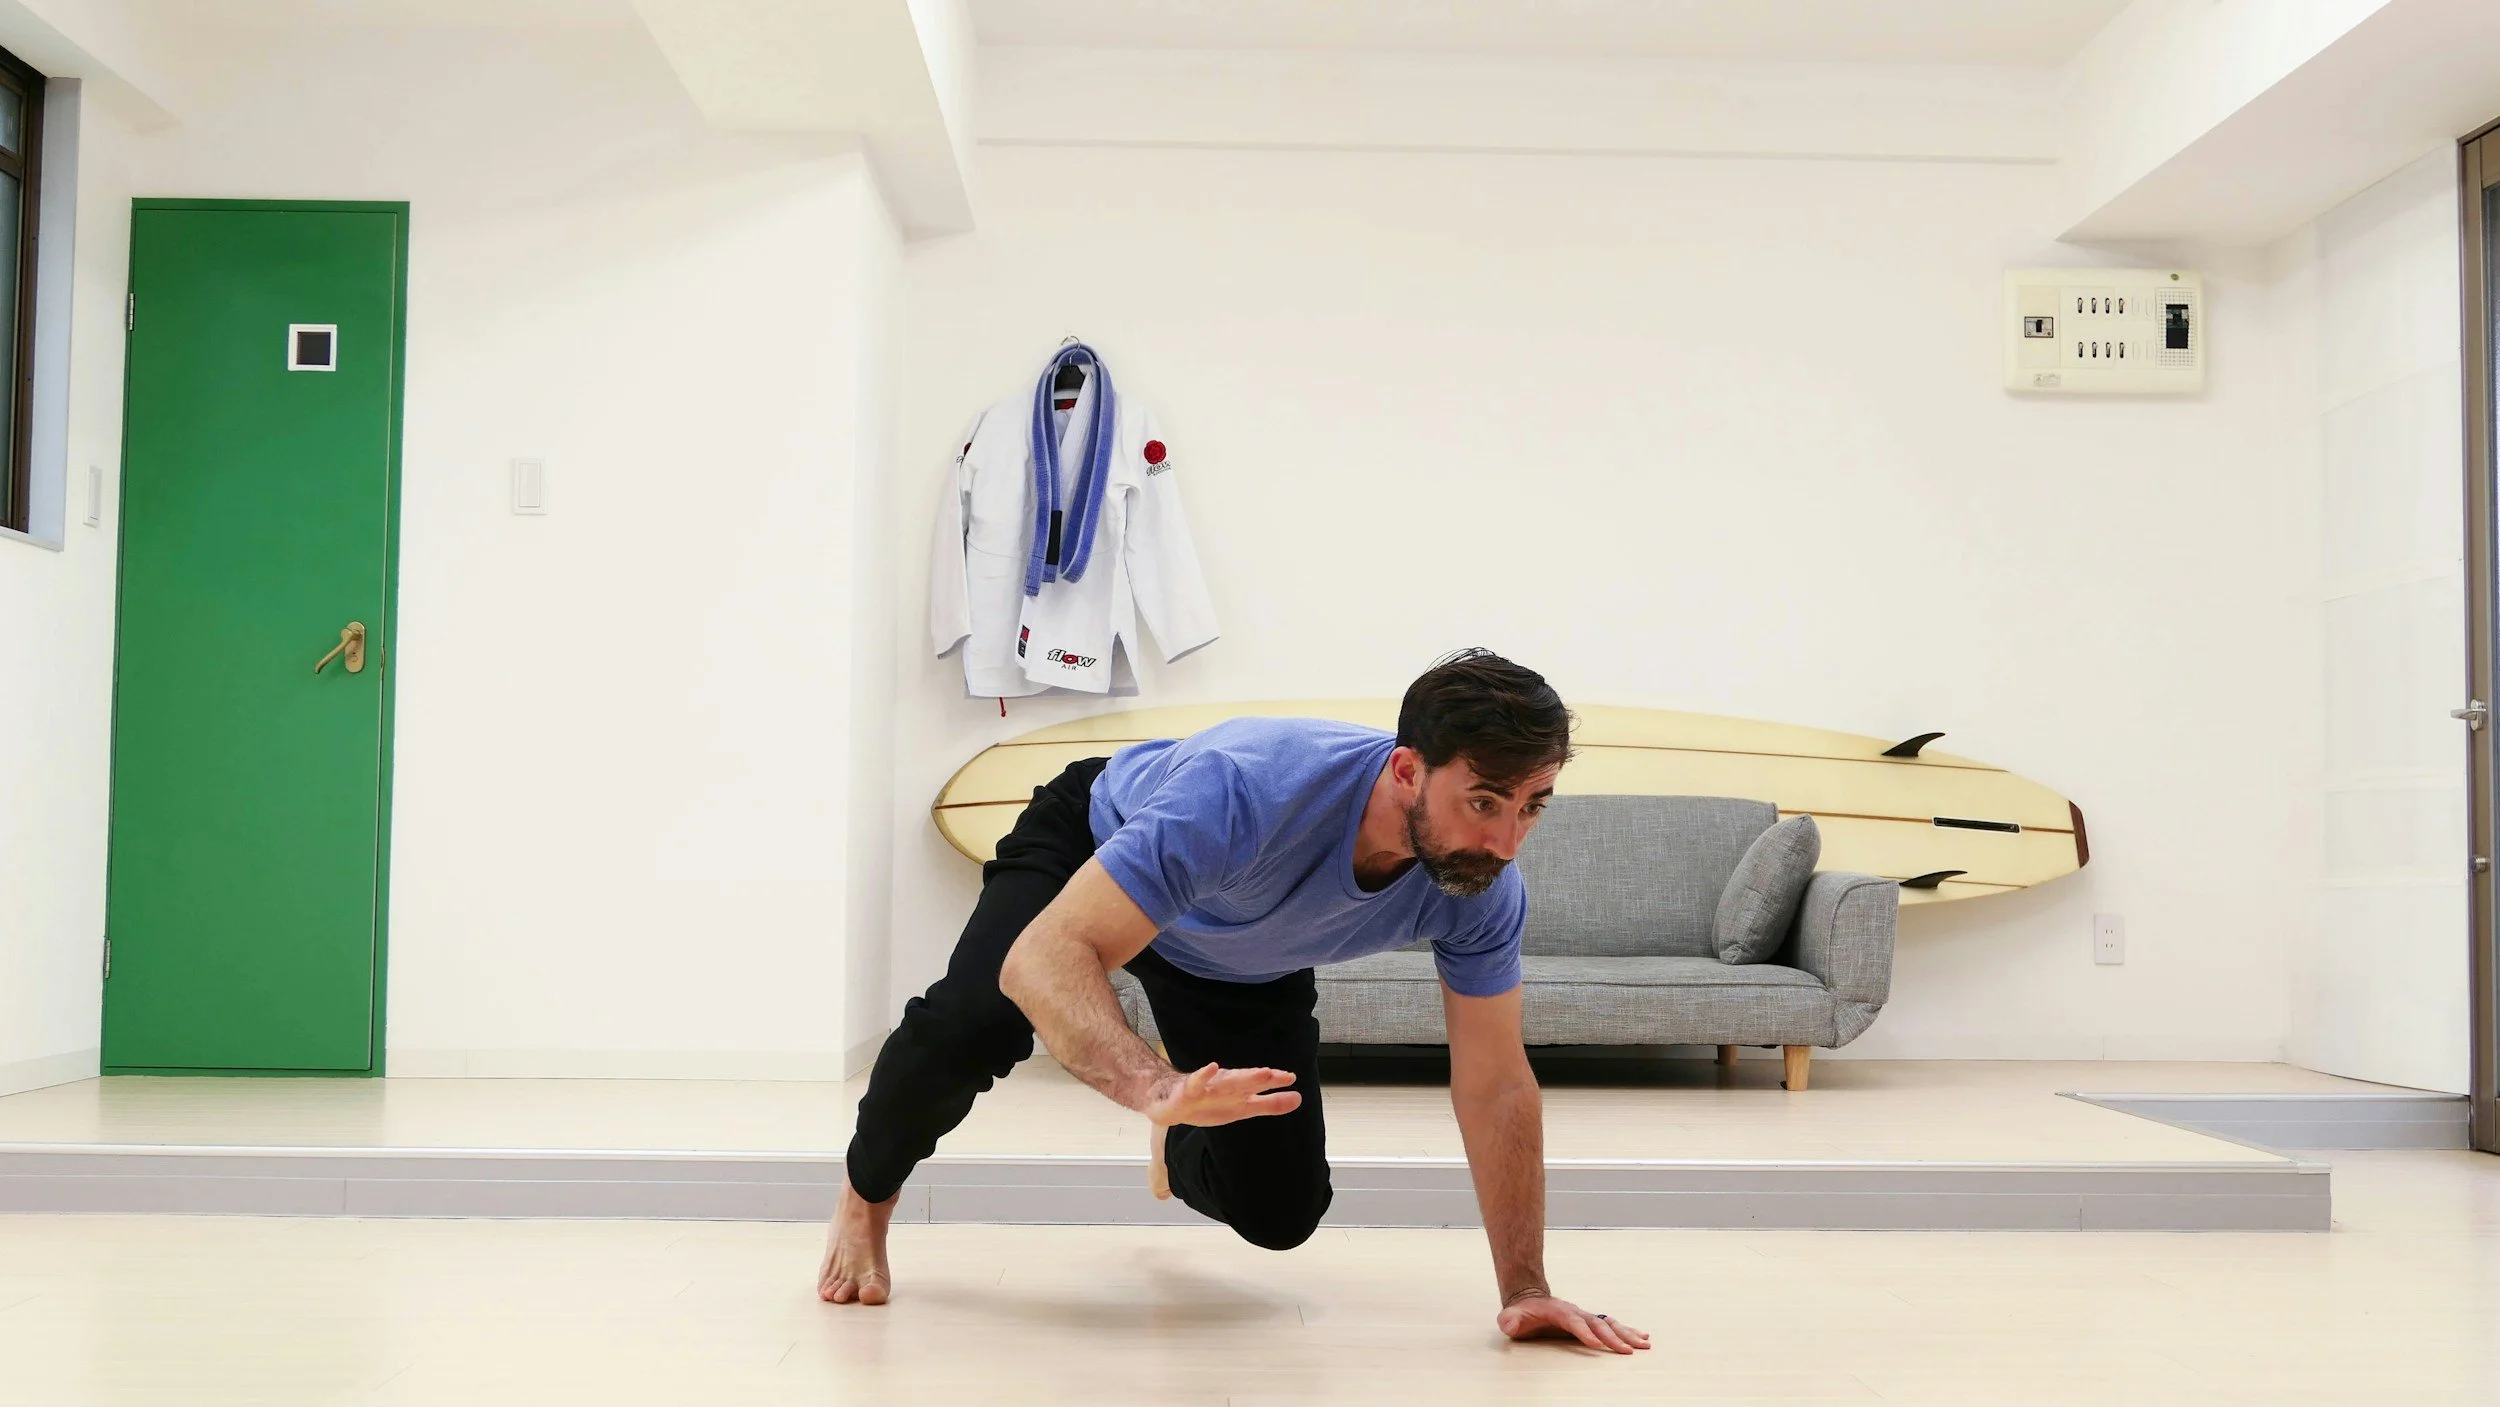
Properly executed bear crawls are performed in a slow yet methodical way with no unnecessary movement.  At baseline, the knees should be directly under the hips while the hands are directly under the shoulders.  Both knees should be slightly elevated from the ground but no more than 1-2 inches off the ground, all while the shoulders remain in a relaxed yet stable position.  This means that the trapezius muscles are not excessively elevated, and the scapula properly glides with every step.  An athlete performing a well-executed bear crawl should be able to balance a glass of water on their back without a drop spilling because they are under control and maintaining a neutral spine throughout.  With every step, one hand should move forward while the contra-laterally corresponding foot moves in concert.  A well-executed bear crawl is not only challenging but should feel very difficult. 

How To Incorporate Bear Crawls

Once a firm understanding of how to execute the Bear Crawl movement has been achieved, it can still be difficult to understand where it optimally fits into a training program.  Traditionally, they have been used as a method of conditioning, warm-up, or punishment for those who feel a bit devious.  While the latter two methods can still be an option, conditioning, and crawling are rather incompatible in that they should not be performed for long stretches at a time because maintaining high-quality form is of utmost importance and is extremely hard to do for extended periods which conditioning requires.  Instead, Bear Crawls can be included as s stand-alone movement or supplemental movement within a properly constructed training program.  Crawling and more specifically bear crawls offer a unique approach to training a movement pattern that is often neglected or forgotten by adults of the modern age, even those who train regularly.  Practically speaking, the following progression is an option for those who wish to begin incorporating Bear Crawls appropriately:

Week 1-3: Regular Bear Crawls

-       Sets: 3-4

-       Distance: 10-15 Meters for each set


Weeks 4-6: Backwards Bear Crawls

-       Sets 3-4

-       Distance 10-15 Meters for each set

Weeks 7-9: Lateral Bear Crawls

-       Sets 3-4

-       Distance 10-15 in each direction per set

 These progressions are not to be hard-coded by any standard and can be altered or mixed/matched depending on one's ability to effectively execute them.  The most important piece to appropriately implementing crawling movements is to execute them low, slow, and with precision.  They are a fantastic addition to all programs and will aid anyone who seeks to regain or maintain their primitive locomotive function.  Keep crawling on my friends.